Roadmap
This article covers:
- Why I upgraded my audio interface and what I set out to achieve
- The hardware signal chain (including mic, Cloudlifter, and Babyface Pro FS)
- How software routing (Audio Hijack, OBS, Wirecast, TotalMix FX) ties it all together
- Managing streaming complexities—background music, copyright, and multi-output scenarios
- Dynamic control during streams and automation with Stream Deck
- Monitoring and achieving clean, reliable audio in real-time
Now, let’s break down the hardware foundations that make this setup possible.
New Audio Interface, New Setup
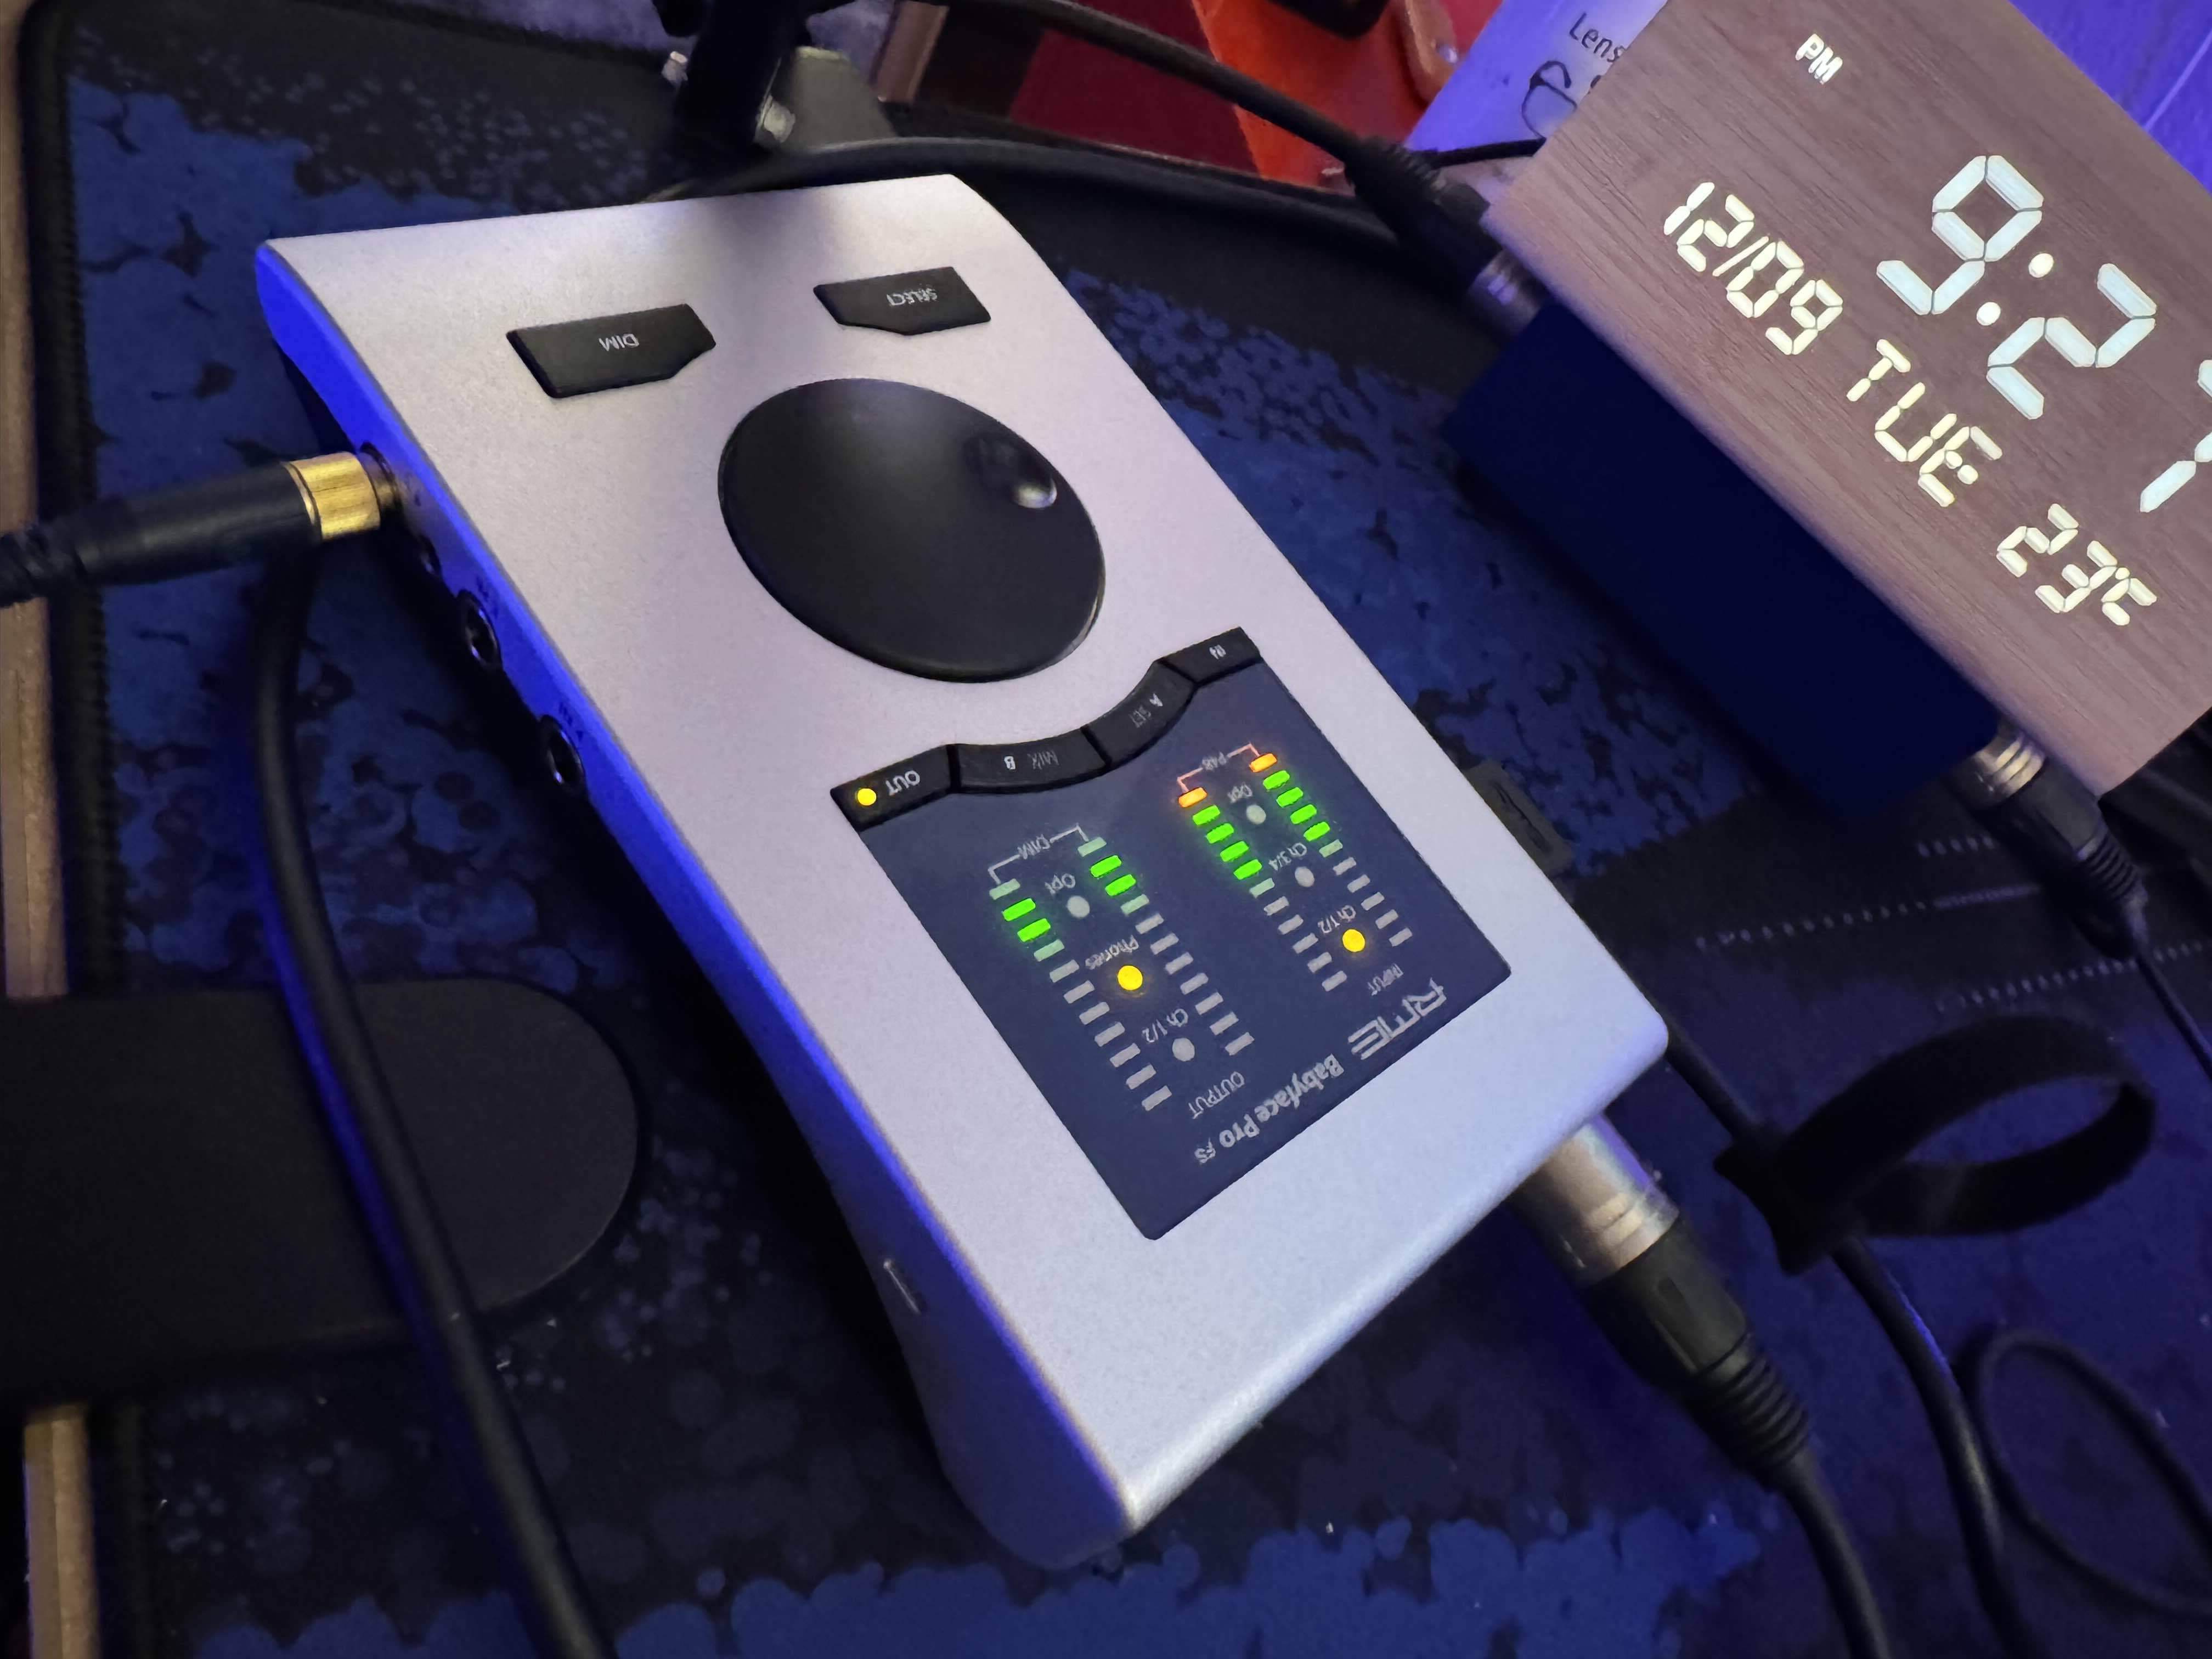
I recently bought a shiny Babyface Pro FS audio interface.
With 24 channels, 6 hardware outputs, 6 hardware inputs, and 6 software playback virtual inputs, it is a powerhouse. Yes, it has “some”(?!) “learning curve”, but when you get the hang of it, it provides endless possibilities.
But most importantly, it has a very clean output with an almost zero noise floor (around -50 dB). That is much better than comparatively lower-end amplifiers like Focusrite Scarlett Solo or Volt 2. This is especially important for my setup because I have a very-gain-hungry microphone: Shure SM7B. With Shure hungry hippo, even the smallest noise floor gets elevated when I increase the audio interface’s input gain by 40–50 dB.
Moreover, the added noise becomes even more pronounced when you apply voice compression and other additional filters to the output.
Thus, with the new Babyface Pro FS, I had two goals in mind:
- Minimize digital audio processing to reduce residual background noise as much as possible.
- Have a “good enough” system that increases gain solely with hardware so I don’t have to “eat the microphone” while debugging a complicated codebase on live stream.
This article describes how I established these goals, and provides an overview of Audio Hijack’s and Babyface’s interfaces.
Lift Input Gain with Cloudlifter.
To increase the gain of the input signal a little bit more, so that I can minimize software-based audio post-processing, I also have a CloudLifter X in my audio pipeline.
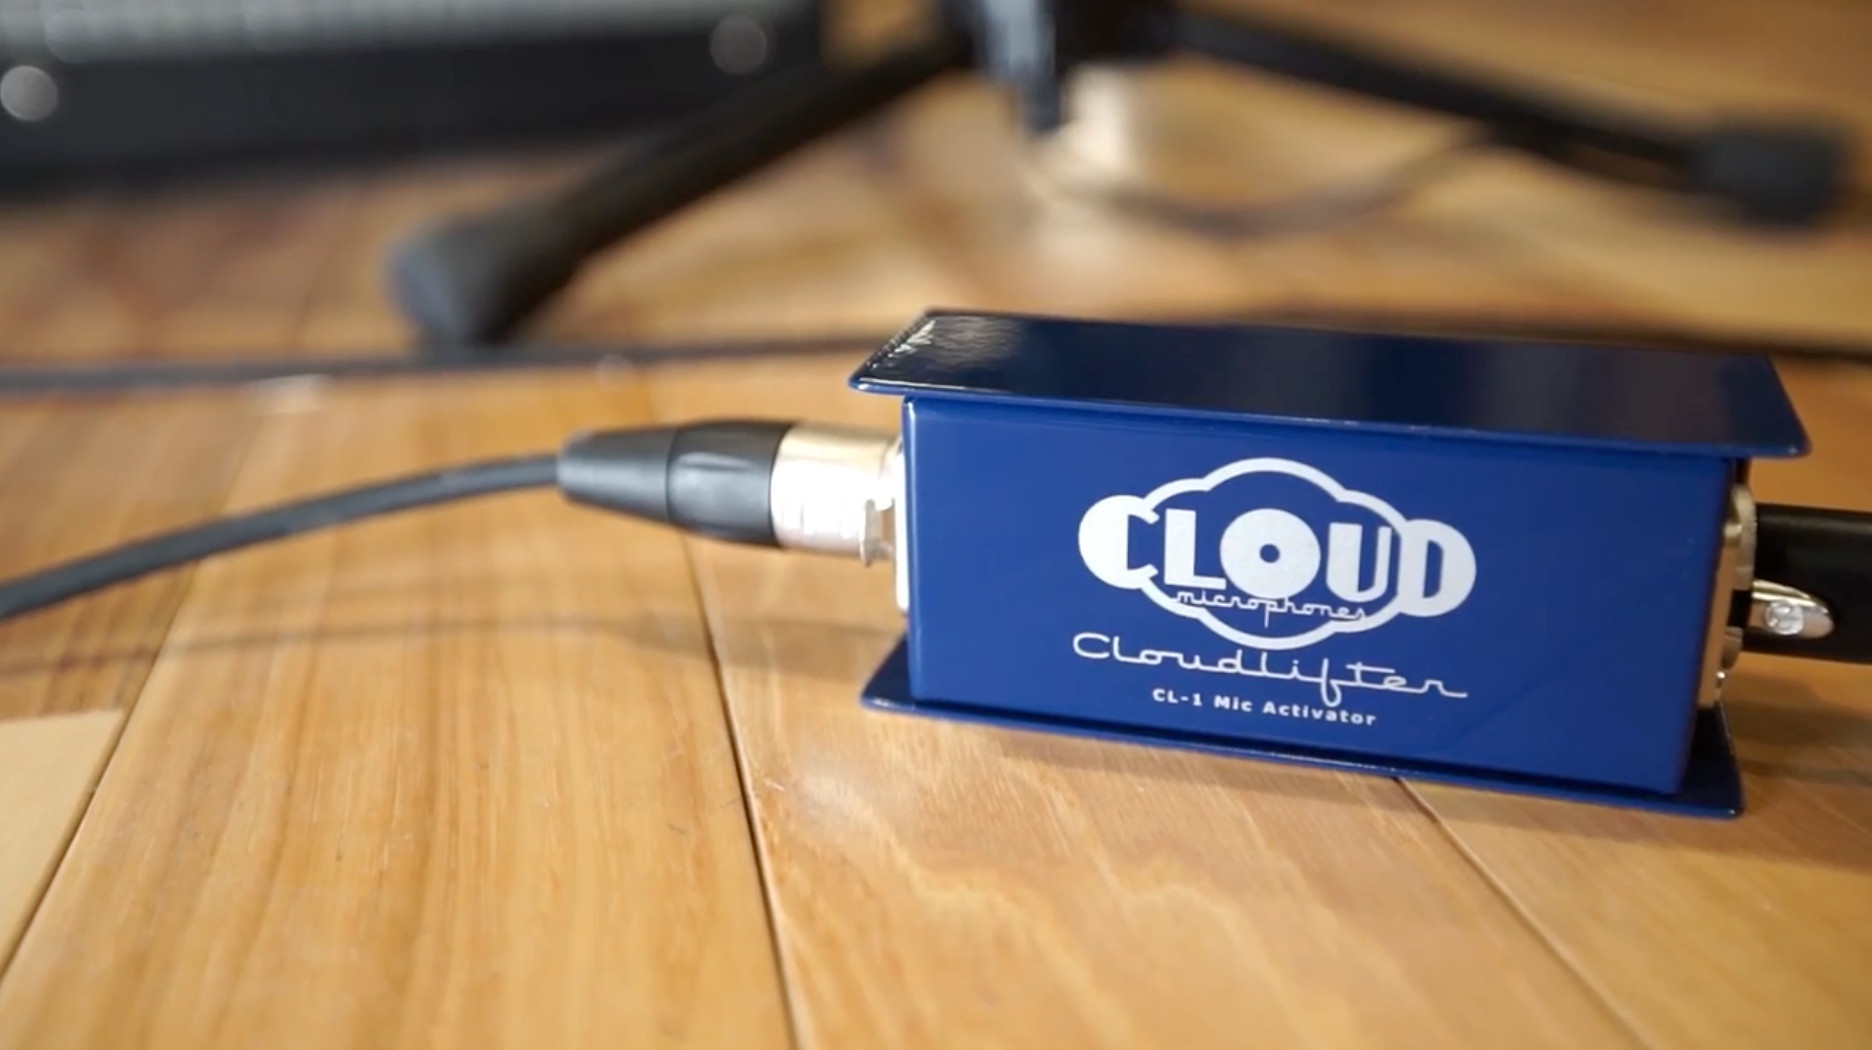
Cloudlifter X.
Here is how my audio input components are connected:
┌────────────────────┐
│ Mac Studio (USB-C) │
└────────────────────┘
           │
           ▼
┌────────────────────┐
│  BabyFace Pro FS   │
│  AN 1/2 (XLR in)   │
└────────────────────┘
           │
           ▼
┌────────────────────┐
│   CloudLifter X    │
└────────────────────┘
           │
           ▼
┌────────────────────┐
│  SHURE SM7B (mic)  │
└────────────────────┘
With the physical connections in place, the next step is to configure the software to get the most out of this hardware.
Less Processing, Better Quality
In my older streaming setup, I heavily used software audio loopback interfaces and post-processing. With Babyface, I was able to move many of these operations directly to the hardware interface, offloading them from the CPU and using a device designed for audio routing and mixing.
The result was much natural and smoother.
In addition, since Babyface was doing such a great job of reducing the noise floor, I didn’t need many modifications to the input signal anyway. It was such a relief, because whether you do it in hardware or software, the less you touch a waveform, the better it sounds.
Streaming Pipeline Complexity
Of course, streaming isn’t just about clean audio—it’s about managing multiple sources, outputs, and the occasional copyright headache. Here is how I tackled those real-world challenges.
I typically do two types of live streams:
- Either just myself, with some light background music from Spotify
- or co-streaming with multiple guests, accepting their audio input from a shared Zoom session.
When I stream, I may stream to multiple places in parallel using Restream.io.
Streaming Spotify on Twitch is fine, as long as you don’t publish the live stream as a VOD and just play non-DRM-free music during the live stream; however, streaming the same content to YouTube is problematic, since YouTube does not allow copyrighted content even during the live streams.
That added some complexity to the setup, because I’ll have to send DRM-free music to YouTube and other platforms, while sending really cool music that the audience likes to Twitch.
For DRM-free music, I use Endel, which generates calming AI-generated background sounds; it is totally copyright-free.
To Duck or not to Duck
Another thing that I needed to configure is the background music’s gain level: When I am talking, I want to keep it around 5-10%, and when I’m not speaking and doing a focused programming session, for example, I prefer to elevate it around 40%, so that the audience can enjoy the music, while I can continue my focused work.
There are ducking plugins that achieve this effect automatically. Yet, I personally don’t like them because they distort the beginning of the speech, cutting off my initial words every once in a while. They can also activate unnecessarily to other noise sources in the room, disrupting the stream.
Thankfully, I have Stream Deck to change these levels instantly by simply pressing a button.
Audio Hijack Configuration
Let’s continue with Audio Hijack configuration.
Overall, I have four audio input sources:
- My microphone
- Zoom (guest) audio
- Endel (DRM-free audio)
- Spotify (Copyrighted music)
And these sources need to change state depending on the kind of streaming I am doing. And these changes can happen dynamically during a single streaming session, too. So… automation ftw!, but we’ll come to that later.
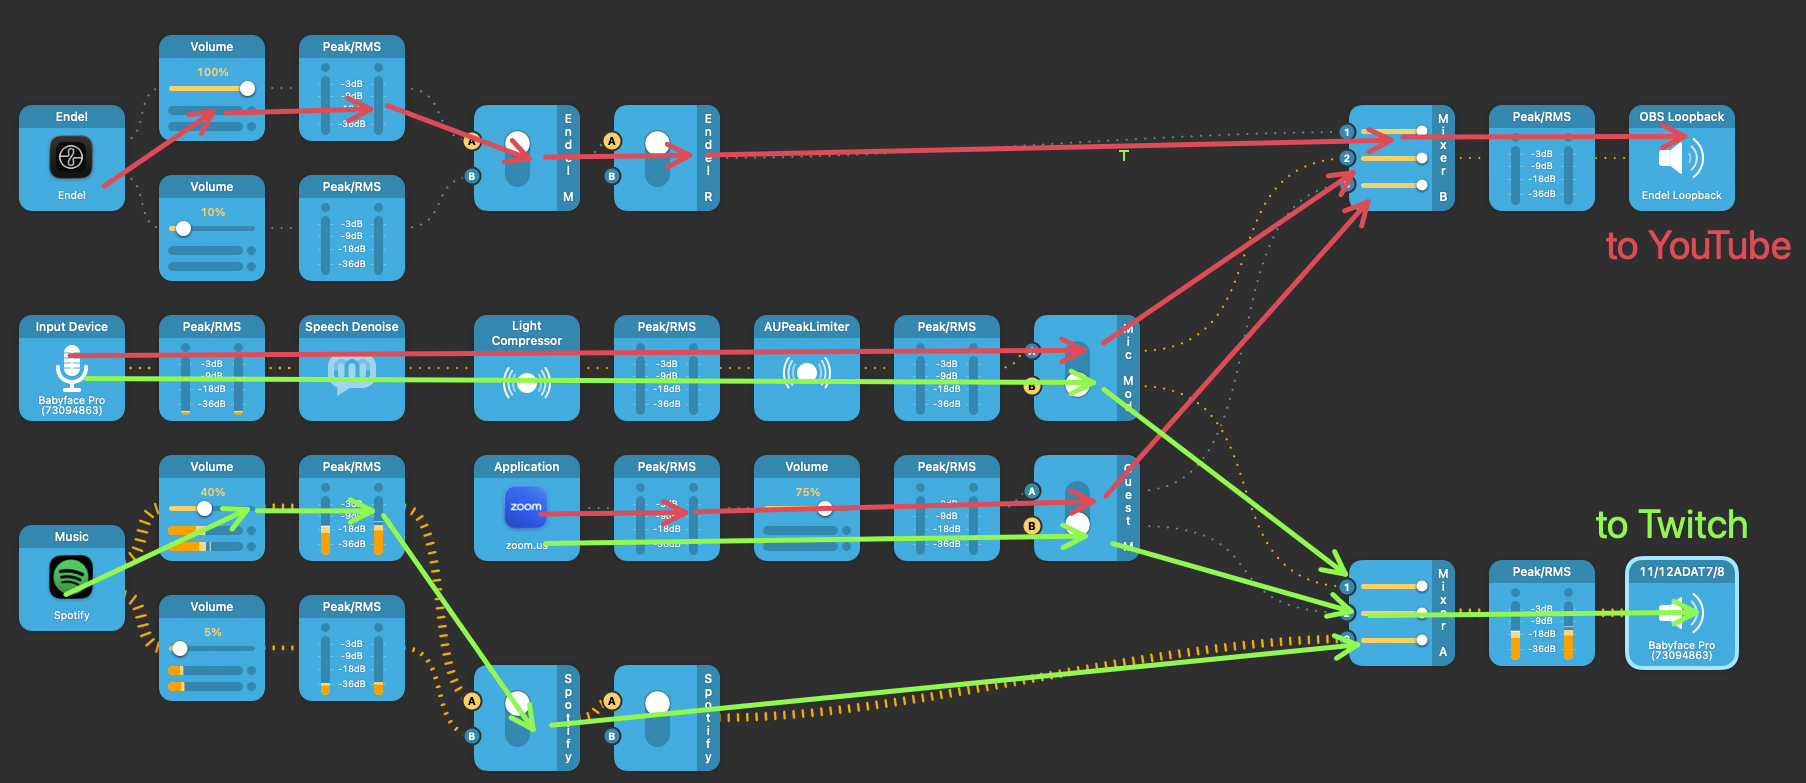
For my unique streaming needs, I created the following pipeline:
Hint
You can open these images in a new tab to view larger versions.
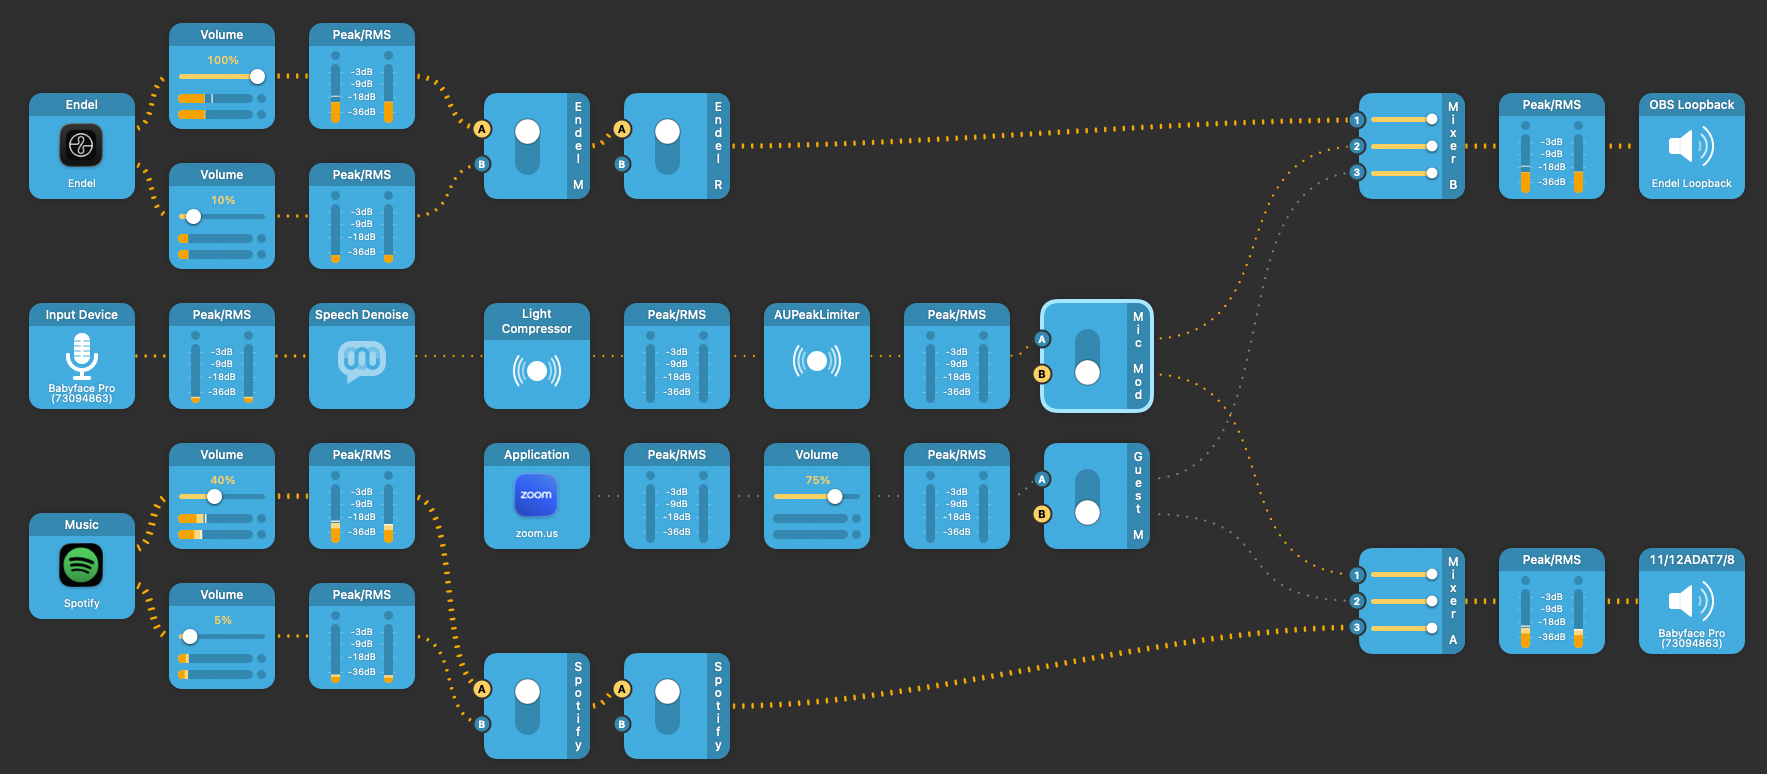
AudioHijack pipeline.
- The Endel audio is split into two with different gain levels, then mixed with my microphone audio after some post-processing. The resultant audio is fed into “Endel Loopback”, which becomes the audio source for OBS Studio. OBS Studio directly mirrors my main streaming app Wirecast, but it uses DRM-free background music from Endel.
- Similarly, Spotify music is split into two with different gain levels and fed into Babyface Pro FS’s software playback (PB 11/12) input, which corresponds to ADAT 7/8 software input.
- Zoom audio is also split-fed into both Endel Loopback, and Babyface Pro FS software input channel. OBS Studio uses Endel Loopback as the background audio source, whereas Babyface Pro FS software audio input is “looped back” through hardware to Wirecast.
Endel Loopback is the only software loopback interface I have had to create. It is targeted for OBS Studio’s audio ingestion. This is not because of Babyface’s limitations, but because OBS Studio does not properly recognize Babyface’s output channels.
In this case, Endel Loopback is just a pass-through virtual interface that does nothing other than act as a bridge.
Here’s OBS’s audio input configuration:
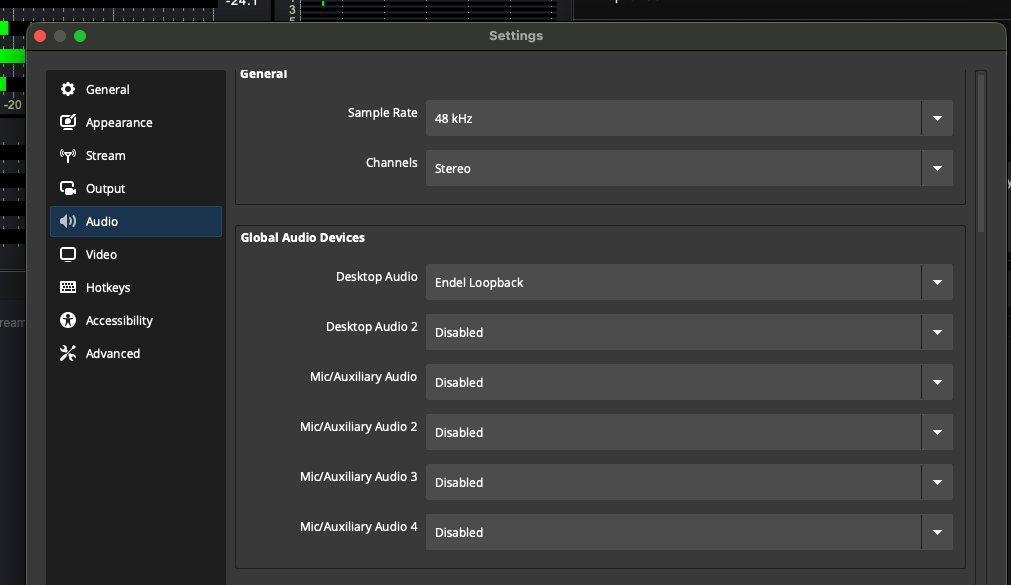
OBS Studio audio configuration.
And here is the Loopback “Endel Loopback” interface:
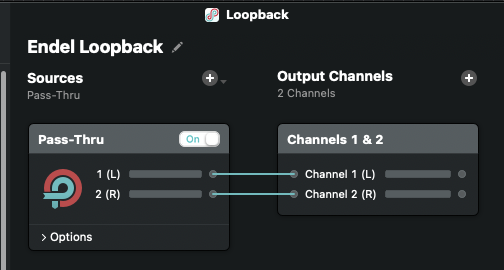
'Endel Loopback' Loopback interface.
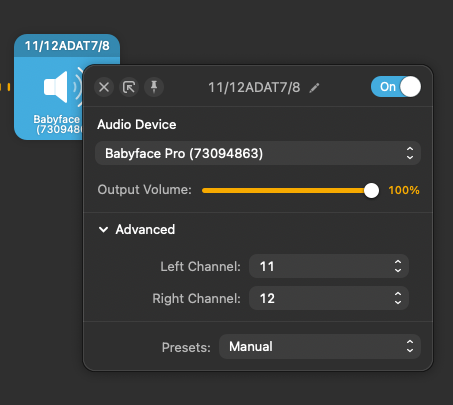
For the Wirecast input, here is how the audio input in Wirecast is configured: It is listening to the channels 11/12, which correspond to the ADAT 7/8 software input Loopback in Babyface.
Wirecast audio input.
Here’s how the Audio Hijack output is configured:
AudioHijack audio output.
Note that Wirecast maps to the same input channels as ADAT 7/8 (which, again, correspond to channels 11/12 in Wirecast’s mapping).
What Goes Where
And here is the overall information flow:
Audio Hijack information flow.
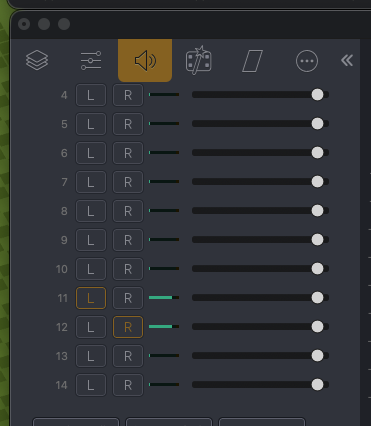
Mixer Setup
Then, in the mixer RME TotalMix FX, which comes prepackaged with Babyface Pro FS audio drivers, I create a loopback interface from ADAT 7/8 software input channel to ADAT 7/8 output:
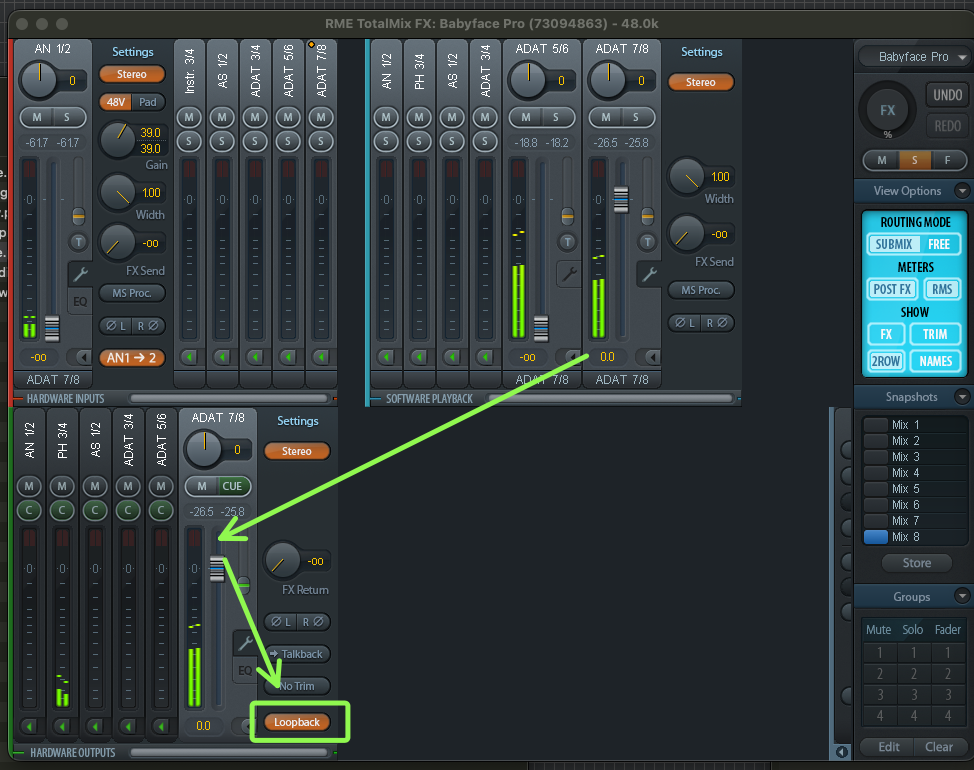
Babyface loopback interface.
This is what Wirecast consumes.
What is the Matrix?
By the way, you can see all these internal channel mappings in Babyface Pro FS in the mixer’s matrix view. It requires some “getting used to”, but once you get the hang of how the rows and columns tie together, it is really invaluable in debugging your audio flow.
This way, you can ensure every input is routed to the exact output channel you want.
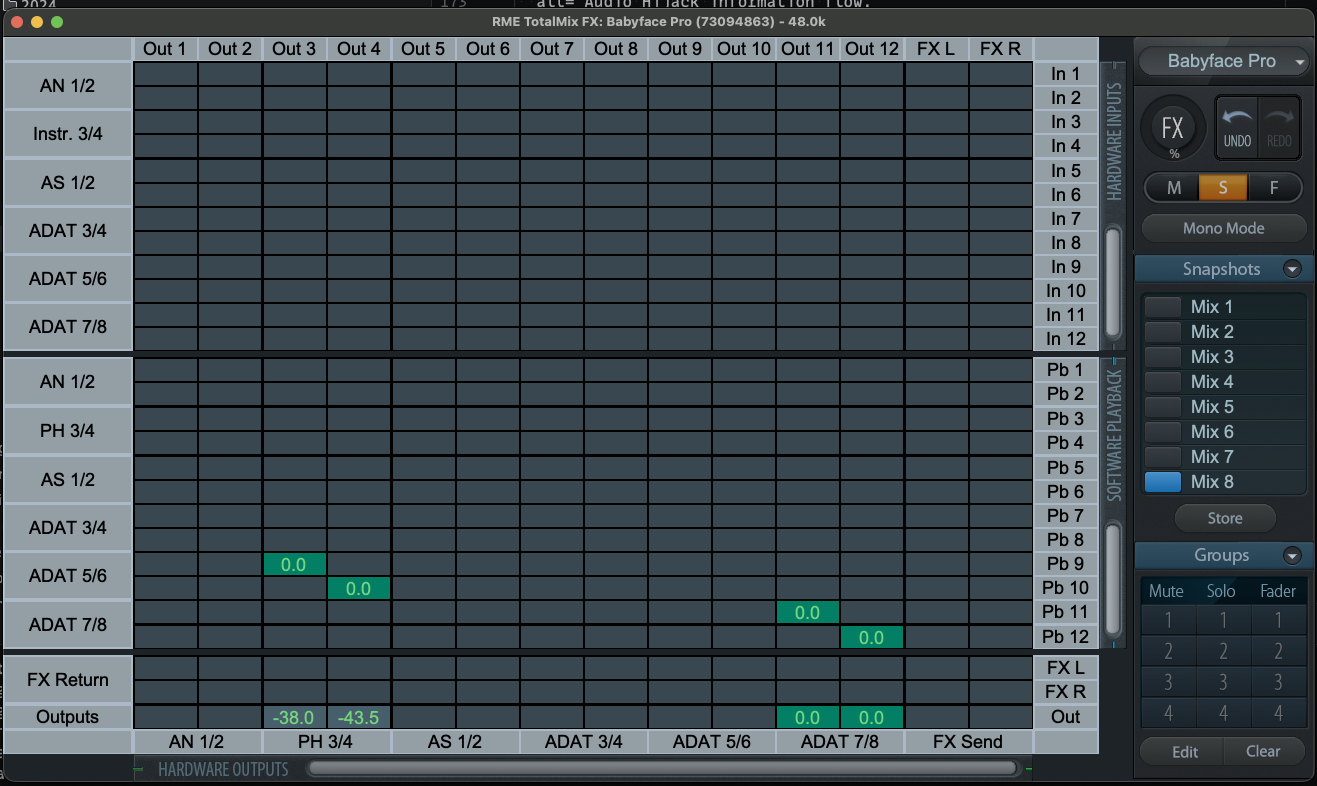
RME Totalmix matrix view.
And for some clarity of mind, so that you don’t have to memorize what cryptic interface name maps to which one of your devices, you can give these interfaces custom names.
Below, I have renamed “AN 1/2” to “Shure SM7B” because that’s the microphone I’m using; “PH 3/4” to “Headphones”, and “ADAT 5/6” to “What I Hear”, which makes much more sense and eliminates the mental math of remembering numbered interface names during the stream, in case you need to do some real-time adjustment, need to recall which one is which.
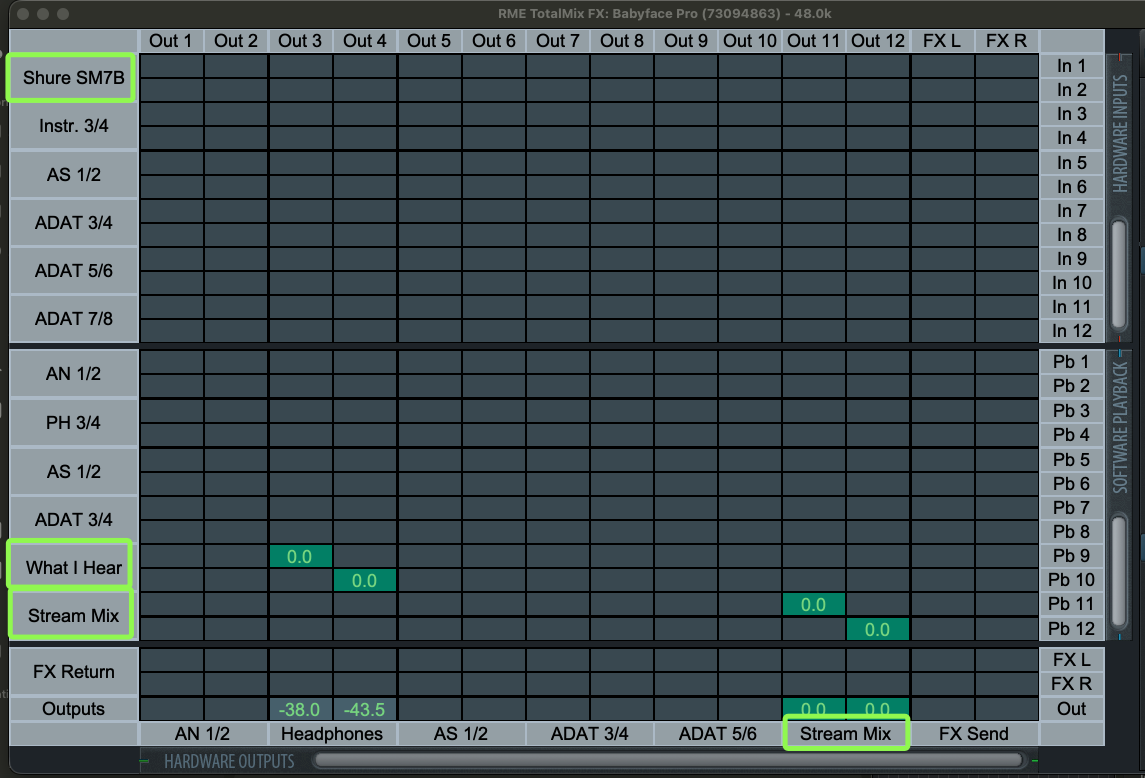
RME Totalmix matrix view with renamed channel names.
What I Hear
So, what does the “What I Hear” interface receive, though?
One issue so far here is that I don’t listen to any of this background music. All outputs we have defined are routed directly to the stream mix.
What’s the fun in streaming if I’m not listening to what I’m playing, isn’t it?
For that, I have a separate Audio Hijack session:
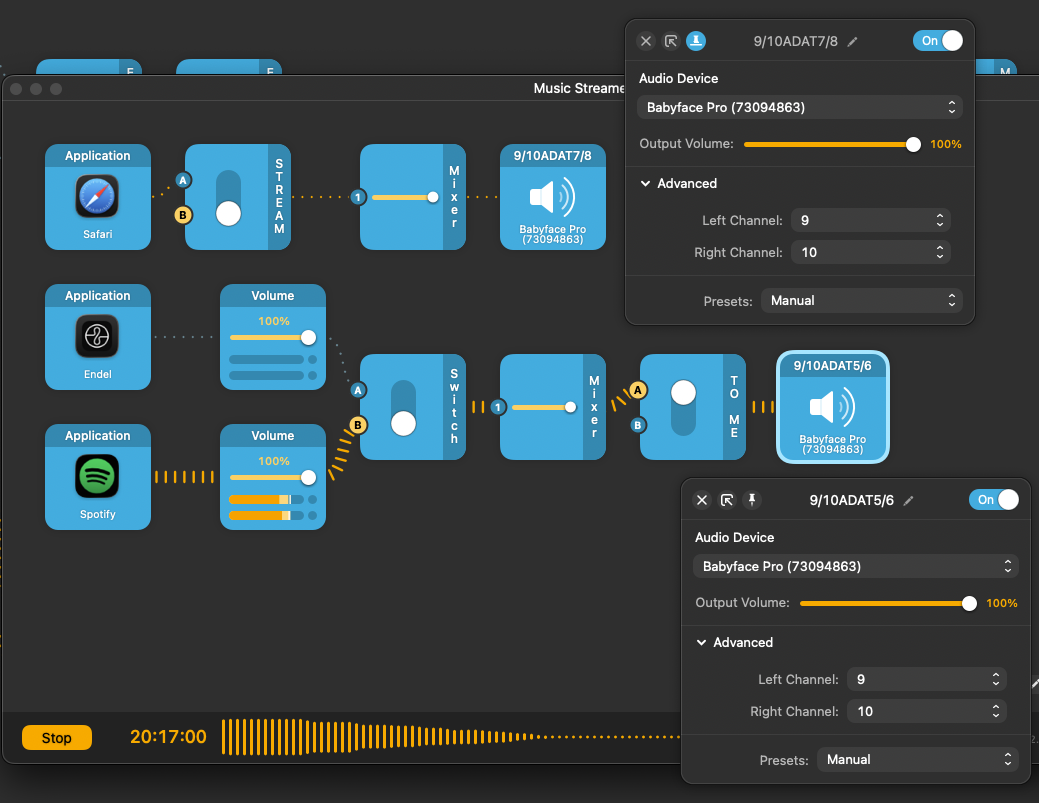
Audio Hijack information flow.
I redirect whatever I want to hear in the background to channels 9/10 of Babyface, which correspond to the ADAT 5/6 software input interface.
Audio Input Pipeline Cleanup
Shure SM7B is a studio-grade microphone, and it requires (ahem—“demands”) you to speak very close to it (less than a handspan distance from your mouth to the mic). However, that’s not always practical during a live coding session. Regardless, SM7B is very gain-hungry.
So, in my audio input pipeline, I had to compensate for:
- Hungry gain requirements of SM7B (especially when I’m using it at a distance between one and two handspans),
- Cleaning up the noise floor that might result in such gain adjustments,
- Dynamic adjustment of the audio signal if I move around or lean back, thus moving away from the microphone,
- And (although it’s very difficult to intentionally make a Shure SM7B’s output waveform overshoot and clip—these are truly gain-hungry monsters), handle any output overload and clipping issues that may happen during the stream.
- And to monitor all of this in real-time, with as minimal a distraction as possible.
Hardware Gain Adjustment
Let’s start with gain.
I found the sweet spot for my input gain increase on the audio interface to be around 39 dB to 42 dB; anything above that range began to overshoot. Depending on how you use your mic, your levels may vary, of course.
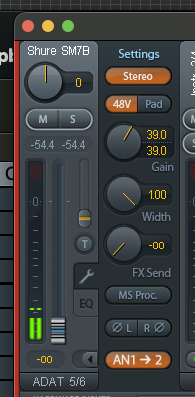
RME Totalmix input gain.
This adjustment is done at the hardware level, and it is the cleanest output you can get without introducing any additional software modulation.
However, since I might need to modify the gain in real time during the live stream, I created 8 snapshots, ranging from 46 dB to 39 dB: This is much easier than trying to turn a virtual knob in real-time: Something tough to manipulate with precision.
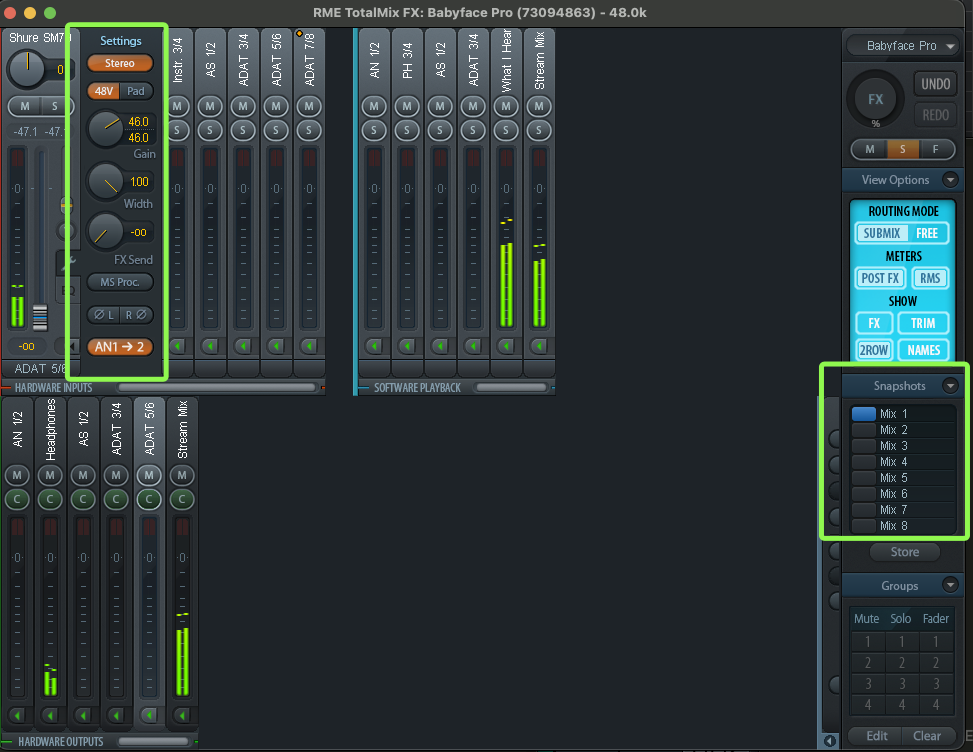
RME Totalmix snapshots.
Remove that “Hiss”, Our Preciousss
Next, get rid of the noise floor. For that, In Audio Hijack, I added aSpeech Denoise plugin immediately after the input, which worked beautifully:

Audio Hijack speech denoise.
It’s not visible on this screen, but I also enabled, mono signal processing to preserve some CPU cycles. The microphone input is already mono, so there is no need to process two channels.
Immediately after the speech denoise, I added a very light compression using the Ozone Advanced toolkit with the following parameters:
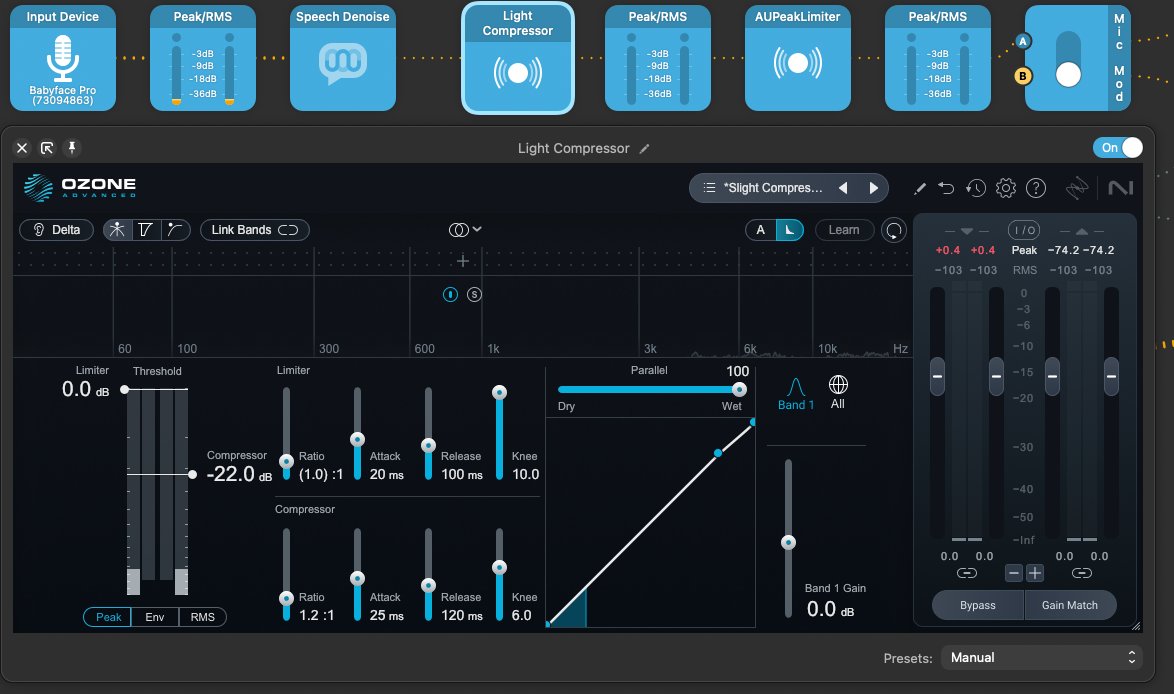
Audio compression.
And finally, not that I’d likely need—but just to be safe—I added a limiter that follows the compressor:
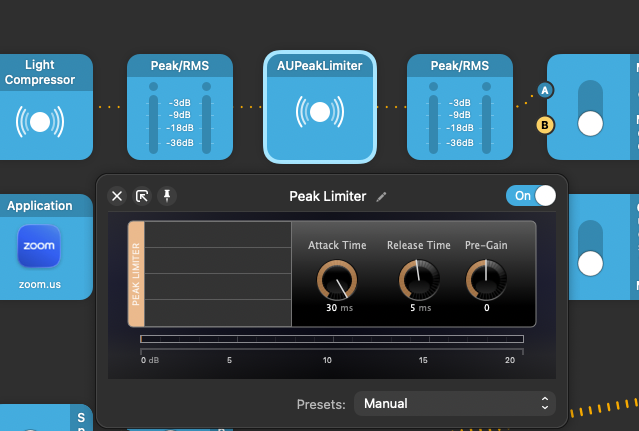
Peak limiter.
And here is all of these put together:

Audio input pipeline.
Once the basics were running smoothly, I wanted to streamline my workflow and make live adjustments effortless.
Wait! Ozone Advanced Has a Limiter Function
So why not use it, right?
I’m not using it, not “because Ozone is bad”, but because of how Ozone’s limiter is designed versus what I need in a live chain.
Ozone’s limiter (Maximizer / Dynamics limiter) is a mastering limiter, not a live safety limiter. So, it is the wrong tool for real-time, zero-latency, never-clip protection, which is what my final limiter is doing.
Ozone’s limiter is designed to:
- Increase perceived loudness
- Shape transients musically
- Use lookahead
- Use psychoacoustic models
- Trade transient accuracy for loudness
- Work with offline or fixed-buffer DAWs
☝️ That is perfect for mastering and dangerous for live capture.
That clarified, now back to automation.
Operation Automation
In the pipeline, you might have noticed these two input switch blocks, each consisting of two input switches.
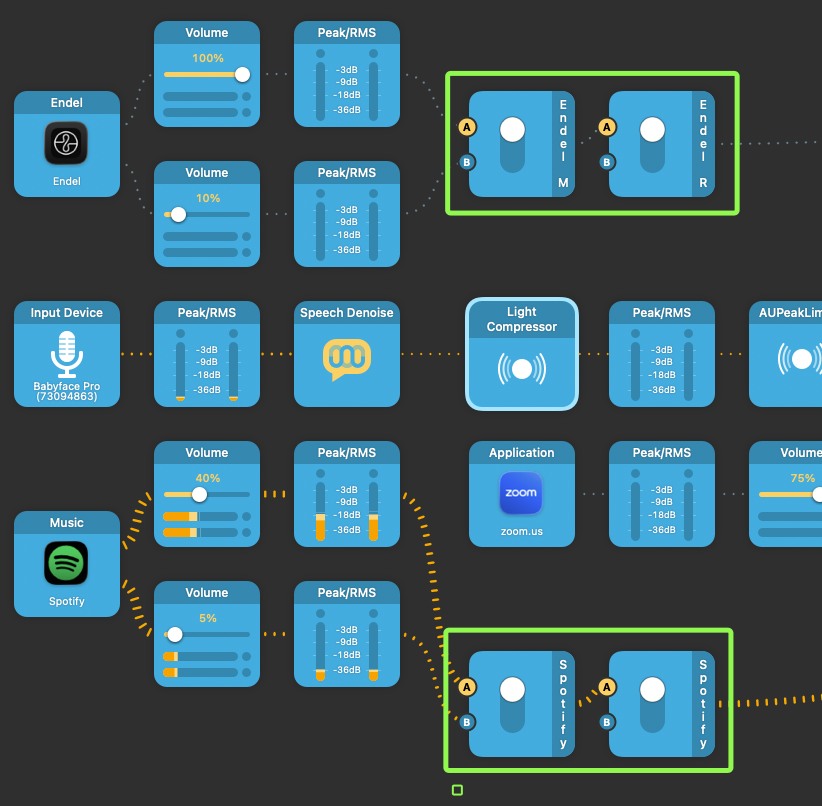
Audio input switches.
They effectively create an audio routing state machine for me. And the best part of it: They are programmable.
For example, here is a script that lowers the background music and elevates my vocals, using the duck() function I defined:
(() => {
  const sessionName = "Stream Session";

  const modeSwitches  = ["Endel Mode", "Spotify Mode"];
  const routeSwitches = ["Endel Route", "Spotify Route"];
  const voxSwitches = ["Mic Mode", "Guest Mode"]

  const s = app.sessionWithName(sessionName);
  if (!s) {
    console.error("Session not found: " + sessionName);
    return;
  }

  function switchToA(name) {
    const b = s.blockWithName(name);
    if (!b) {
      console.error("No block named '" + name + "'");
      return;
    }
    if (b.type !== "InputSwitchBlock") {
      console.error("'" + name + "' is not a switch block " + b.type);
      return;
    }
    b.switchToA();
  }

  function switchToB(name) {
    const b = s.blockWithName(name);
    if (!b) {
      console.error("No block named '" + name + "'");
      return;
    }
    if (b.type !== "InputSwitchBlock") {
      console.error("'" + name + "' is not a switch block " + b.type);
      return;
    }
    b.switchToB();
  }

  function justMusic() {
    modeSwitches.forEach(switchToA);
    routeSwitches.forEach(switchToA);
    voxSwitches.forEach(switchToB);
  }

  function duck() {
    modeSwitches.forEach(switchToB);
    routeSwitches.forEach(switchToA);
    voxSwitches.forEach(switchToA);
  }

  function muteMyself() {
    switchToB("Mic Mode");
  }

  function unmuteMyself() {
    switchToA("Mic Mode");
  }

  function muteGuests() {
    switchToB("Guest Mode");
  }

  duck();
})();
Stream Deck Vox Controls
When you save this file with the .ahcommand extension, then you can define these transitions in Stream Deck too, and switch to one another with the push of a button:
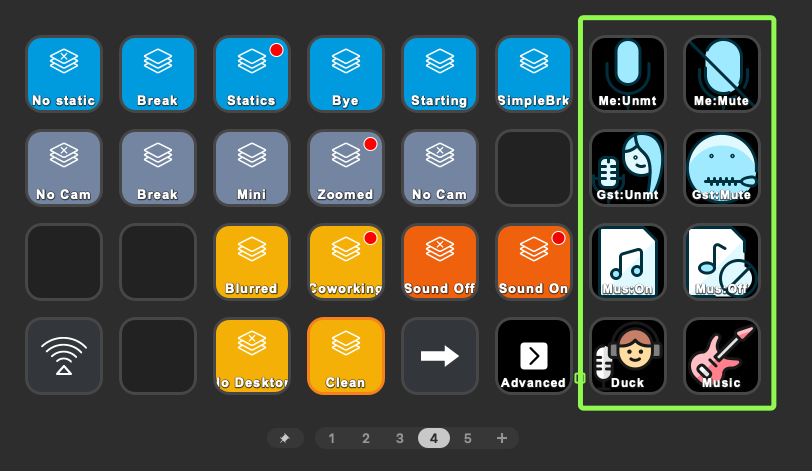
Controlling audio with Audio Hijack commands in Stream Deck.
Here is what these buttons do, from top to bottom:
- Mute/unmute my microphone only, without touching anything else;
- Mute/unmute guest audio;
- Mute/unmute background music, without touching anything else;
- Duck background music for me to talk; mute everyone and just turn on the music (for things like “quick breaks” or before starting the stream while waiting for people to join in the chatroom).
With core routing and controls set up, I needed a reliable way to monitor everything in real time and catch issues before they reach the audience.
Audio Monitoring
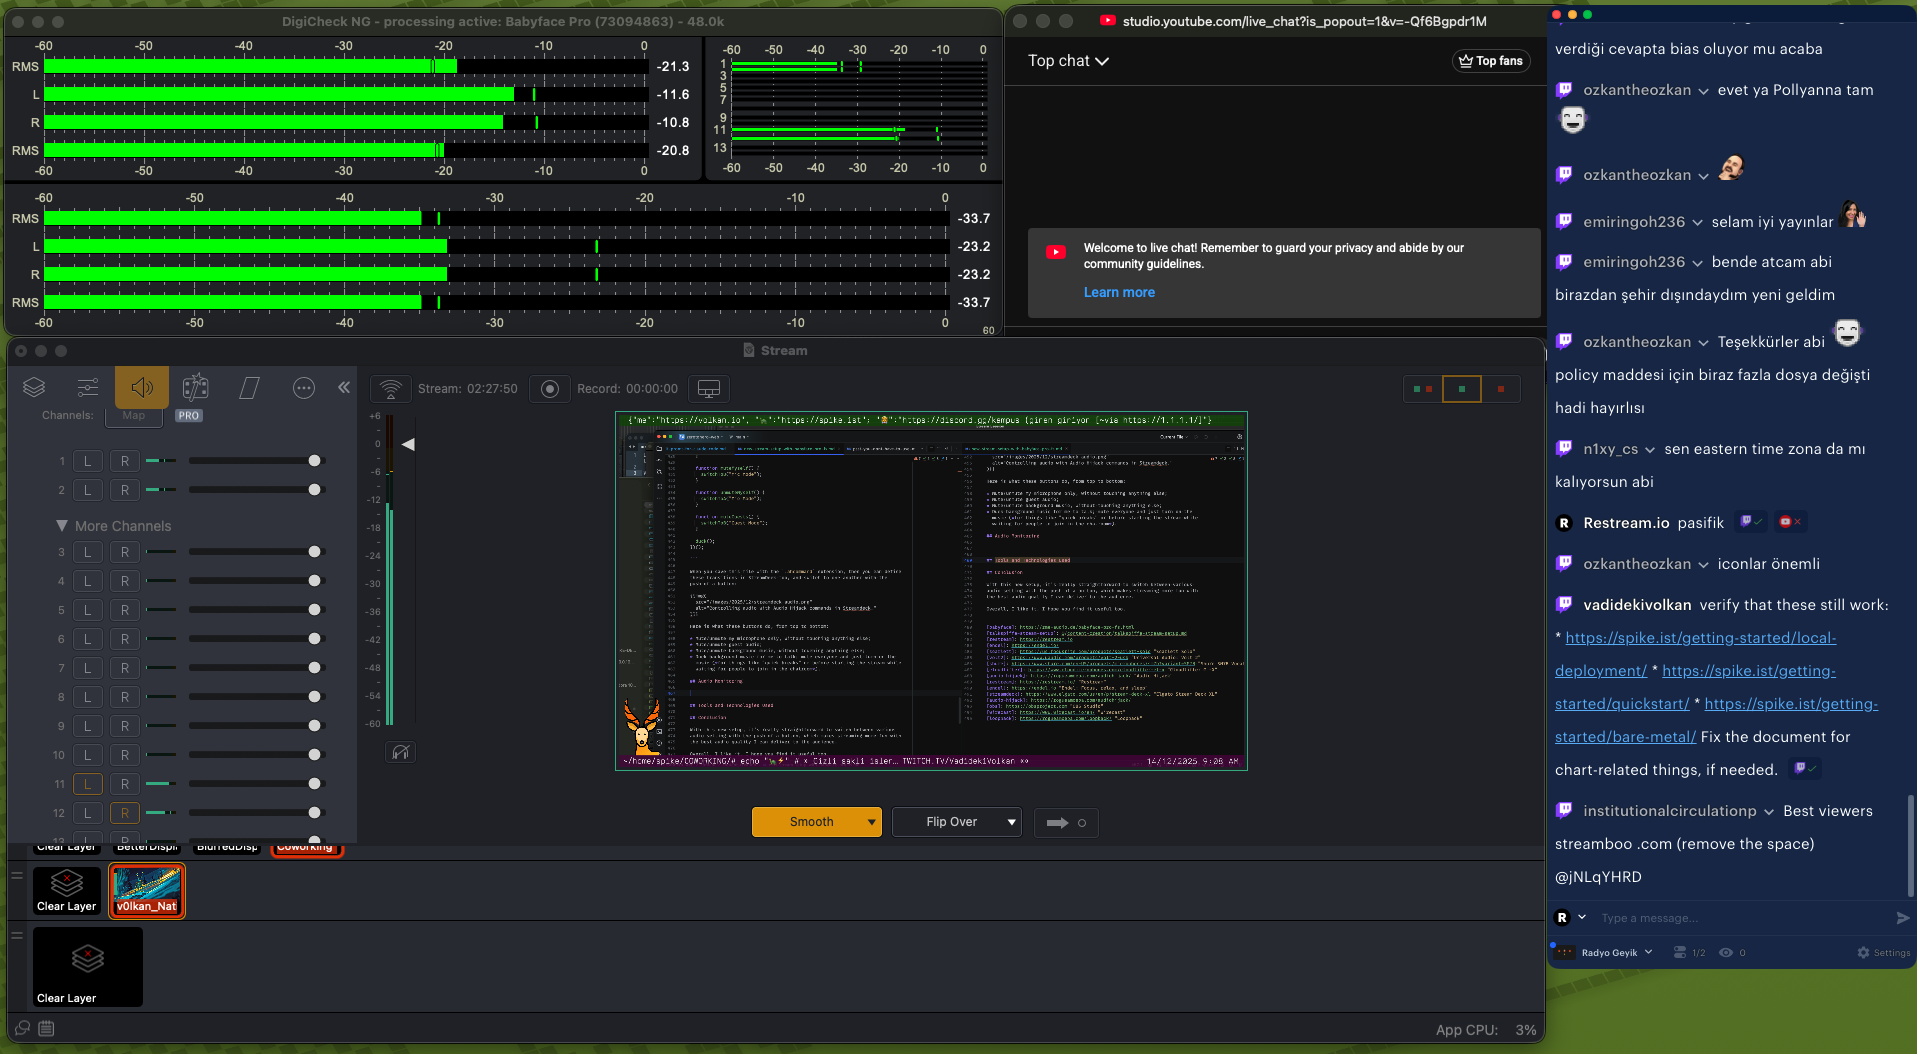
None of these would matter if my vocal output is too low or too high and I don’t notice it immediately during a live stream. For this, I use DigiCheck NG.
In the image below:
- The top horizontal monitor is the actual stream mix.
- The bottom horizontal monitor monitors the microphone output before any processing (if it clips, there is nothing you can do, so I try to keep it around -20dB RMS as best as I can)
- The smaller horizontal monitor in the top-right shows all output channels on the Babyface, so if I inadvertently enable something I don’t need, I will see it immediately.
- The bottom half is Wirecast, which I don’t touch at all because I manage the entire stream screen transitions using Stream Deck, so it merely acts as an unobtrusive visual monitor of the live stream session.
- To the right of the screen are YouTube and Twitch chats.
These all sit in a small secondary display below my main display; always in my peripheral vision, but never distracting me while I’m working with my main monitor.
Stream audio monitoring.
Different Monitors Have Different Outcomes
Here is my stream signal path and where I put various RMS meters:
Mic
 → Babyface ADC
   → TotalMix (input domain)
     → Audio Hijack
       → AH Meter #1 (post-ADC, pre-processing)
         → Processing chain (EQ / Comp / Limiter)
           → AH Meter #2 (post-processing)
             → AH Output
               → Babyface Loopback: ADAT 7/8
                 → Wirecast input
                   → Wirecast meter
                     → Encoder / Stream
ADAT 7/8 is my Stream master bus. That means:
- Anything before AH Meter #2 is not yet final
- Anything after ADAT 7/8 does not exist for the stream
- AudioHijack is one contributor to what ends up on that bus (often the main one), but the truth for the stream is: whatever is on ADAT 7/8 loopback
That makes the meter for ADAT 7/8 Loopback bus in DigiCheck the most direct, single source of truth for the system.
Wirecast’s own meter is still useful but not authoritative for the final stream.
So if I see a red for ADAT 7/8 in DigiCheck, that is an immediate fix now. And the likely fix would be adjusting the input gain of the microphone.
A red on Wirecast (while DigiCheck looks fine) is merely a conservative warning that implies I am flirting with the ceiling.
A red on Audio Hijack #1 would mean input capture is getting hot.
A red on Audio Hijack #2 would mean the process chain is getting hot.
RMS Target Recommendations
The industry standard for RMS is -18 to -14 dBFS. That will:
- Sound present, and “close”;
- Leave headroom for emphasis when needed;
- Play nicely with background music;
- Encode cleanly across platforms.
Anything below -20 dBFS will start to sound “too quiet”. When that happens:
- Viewers will tend to turn the volume up;
- The noise floor (if any) becomes more noticeable;
- Platform normalization will boost and residue badly later.
For background music, the recommended level is -28 to -24 dBFS. Depending on the genre, it can be even higher.
But instead of memorizing all these numbers, practically you can aim to keep your peaks at yellows at all times: That’s what most DJs do, and eventually get natural at this in time.
Tools and Technologies Mentioned
Services
Hardware and Devices
- Babyface Pro FS
- Scarlett Solo
- Universal Audio: Volt 2
- Cloudlifter CL-X
- Shure SM7B Vocal Microphone
- Elgato Stream Deck XL
Apps
Conclusion
With this new setup, it’s really straightforward to switch between audio settings with the push of a button, which makes streaming more fun while delivering the best audio quality I can to the audience.
This project also gave me a much deeper appreciation for how hardware and software can work together to solve practical problems—whether that’s noise management, platform-specific routing, or just the ability to quickly adapt without interrupting a live session.
If you’re considering a similar upgrade or want to streamline your own workflow, feel free to borrow any of these ideas or configurations. It’s been a rewarding journey, and the flexibility I’ve gained makes it all worthwhile.